Non-Dairy Espresso Milk: Your Steaming Success Guide
By Luca Moretti • 13th Jan

If you've ever stood frozen at your espresso machine, watching oat milk separate into sad puddles while your almond milk erupts into bubble volcanoes, you're not alone. This non-dairy espresso milk guide cuts through the chaos with plant-based milk steaming techniques engineered for home baristas who crave café-quality results without café-level frustration. After training thousands of home brewers, I've learned that constraints create confidence, especially when plant milks threaten your morning ritual. Today, we'll transform your dairy-free espresso workflow with bounded choices that deliver taste you can set a clock to.
Why Your Dairy Milk Technique Fails with Plant Milks
Plant milks lack dairy's natural protein-folding structure. Soy's globular proteins shatter under aggressive aeration. Oat's starches seize up past 140°F. Almond's low viscosity lets foam collapse before it hits the cup. When these milks separate or scorch, it is not your fault (it is physics fighting against dairy-centric methods). The pain? Wasted ingredients, ruined espresso shots, and that sinking "guesswork" feeling before your first sip.
The Critical Differences You Can't Ignore
| Factor | Dairy Milk | Plant-Based Milks | Your Action |
|---|---|---|---|
| Aeration Time | 8-10 seconds | 2-3 seconds max | Less air = stable foam |
| Ideal Temp | 150°F | 131-140°F | Stop 10°F sooner |
| Separation Risk | Low | High | Mandatory rest/swirl step |
These aren't suggestions (they are non-negotiable boundaries). I've seen brilliant engineers and doctors freeze at their grinders until they had one clear temperature target. Today, that target is 135°F. Write it on your milk pitcher. Feel it with your hand. This single constraint kills doubt before it brews.
The 3-Step Plant Milk Steaming Framework (No Guesswork)
Forget chasing "perfect" microfoam. Home baristas need reliable texture (bounded options) that prevent separation and deliver consistent sweetness. Follow this workflow exactly for your first 10 steams. Calibrate once; repeat forever.
Step 1: Inject Air Sooner, Stop Sooner (The 2-Second Rule)
Calibration prompt: "Paper tearing" sounds = foam creation. It should last exactly as long as you take to whisper 'plant-based.'
Dairy milk gets 8+ seconds of aeration. Plant milks? 2-3 seconds max, barely long enough to hear the shhhht of air entering. Start immediately when steam hits the milk jug (no waiting for warmth). Position your steam wand tip 1/8 inch below the surface, any deeper and you'll miss aeration; any shallower and you'll blast paper-thin bubbles. For oat milk steaming techniques, this is non-negotiable: its starches seize if over-aerated. When you hear the gentle paper-tearing sound, submerge the wand fully. Done. No more, no less.
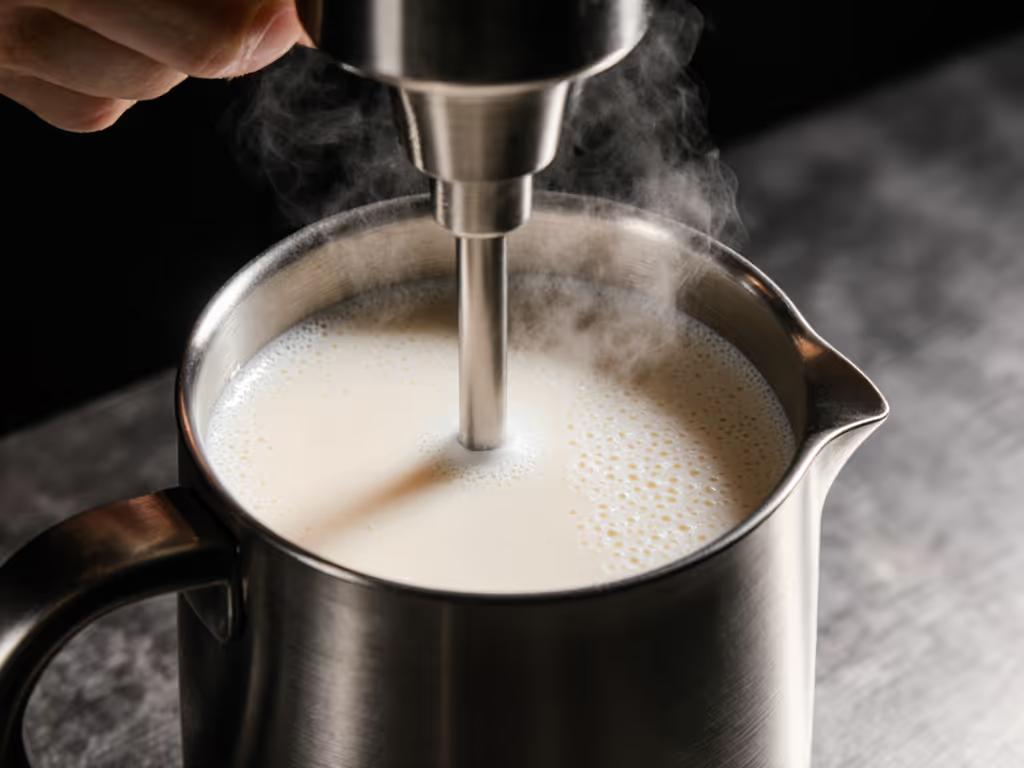
Step 2: Temperature Control: Feel, Don't Guess (The Hand Test)
Soy milk temperature control demands precision. Dairy steams to 150°F. Plant milks curdle at 145°F. Your sensory anchor? Place your palm firmly on the pitcher's side. When it becomes uncomfortable (not painful) to hold for 3 seconds, stop steaming. This is ≈135°F, the sweet spot for all plant milks:
- Oat: Silky texture without slimy starches
- Almond: Minimal separation (critical for almond milk frothing)
- Soy: Smooth integration with espresso
Pro tip: If you're using a thermometer, clip it to the pitcher before steaming. But train your hand (it is faster than reaching for tools at 6 AM).
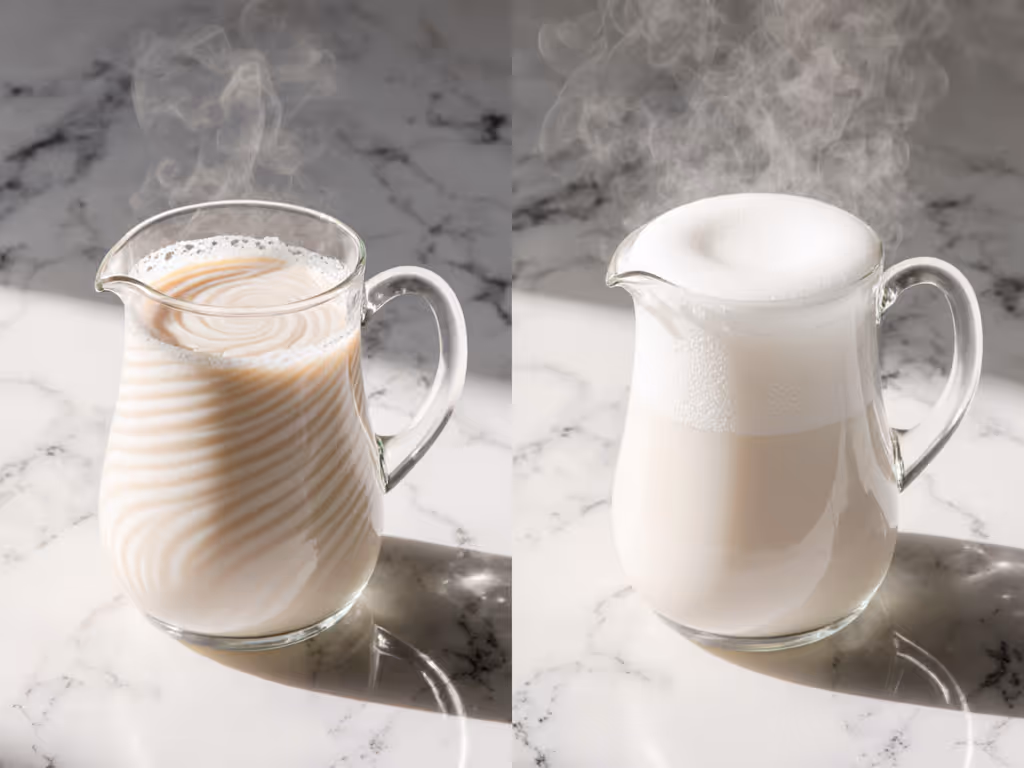
Step 3: The Mandatory Rest (25-Second Reset)
This is where 90% of home baristas fail. Dairy-free espresso workflow requires physics to do the work for you. After steaming:
- Set the pitcher down (no swirling yet)
- Wait 25 seconds (set timer!)
- Swirl aggressively for 5 seconds until uniform
Why? Plant milk foam rushes to the surface the moment steaming stops. That 25-second pause lets bubbles stabilize and rise naturally. Skipping it = watery base + thick foam cap. I've watched beginners skip this "unnecessary" step, then wonder why their latte separates. Constraints did not kill creativity (they killed doubt).
Sensory Checkpoints: Is Your Milk Actually Ready?
Don't trust eyes alone. Use taste and texture to confirm success:
- Sweetness check: Scoop a spoonful. Does it coat slowly? (Good.) Or drip fast? (Too thin, retry with shorter aeration.)
- Bitter trap: Steam past 140°F? Bitterness overtakes sweetness, pitch it and restart. If your shot tastes sour or overly bitter independent of milk, use our dial-in espresso guide to correct extraction before steaming.
- Flat failure: No foam? You aerated too late. Start air infusion in the first 3 seconds next time.
These sensory anchors (sweet/bitter/flat) replace guesswork. When your almond milk pours like warm honey, not water, and tastes sweet before bitter hits? You've nailed it. This is repeatability: taste you can set a clock to.
Why This Works When Other Guides Fail
Most tutorials assume you have a commercial machine or barista training. This framework respects your reality:
- Apartment-friendly: Low-volume steaming (8 oz max) avoids scalding in tight spaces Need a quiet setup? See our espresso machine noise levels compared for apartment-friendly picks.
- Time-crunched: Total steaming time under 45 seconds
- Kid-safe: No scalding-hot milk risking burns during morning chaos
I've seen engineers apply Six Sigma to milk steaming, then stick with this method because it works before their coffee cools. Your goal isn't competition latte art. It's a creamy, unified pour every single morning. That's confidence brewed not from perfection, but simple recipes and checkpoints you can trust.
Your Next Step: Lock It In
Steam the same milk (I recommend barista-blend oat) for 3 days straight using only these steps. Note the time/temp in your brew log. On day 4, try almond or soy, your muscle memory will handle the shift. Constraints create confidence; repeatability breeds better taste. When your partner asks, "How's the milk texture today?" and you know the answer before tasting, that's the win. That's the taste you can set a clock to.
Ready to deepen your skills? Explore how matching your espresso roast profile (darker = less plant-milk separation) completes this workflow. Your perfectly integrated oat milk latte is waiting, one repeatable steam at a time.
Related Articles